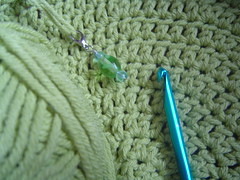
As promised, here is the tutorial for the stitch markers. I put it up over on my Flickr account because I'm being lazy right now and don't feel like copying everything over to my blog. (Sorry, but I'm super tired and dealing with a sick 3 yr old. No fun for us today!)
Anyways, you can check it out and if you have ANY questions at all about it just ask! The pics are a little bit on the "low quality" side because apparently I can't do 3 things at once. Also, I took the pictures a few nights ago and we don't have good lighting in our house (which I find ironic considering James is an electrician). I used my yoga mat as the back ground because I didn't want to use white because I was afraid something would "blend in" to the background.
Well, I'm off to go cuddle with my sick L. I don't like it when my babes are sick, it breaks my heart.
Thursday, September 13, 2007
Stitch Marker Tutorial!
Friday, September 7, 2007
Knitting Needle Case *~Tutorial~*


I have (like any another knitter) TONS of needles and they are now officially at the point where they got out of hand and needed a home. James got me some 16" circular needles for my birthday and that's what sorda put this project in gear. It fits ALL (well, almost all) my needles and I'm in love with it. Plus, it's super easy to make and you can crank one out in an afternoon.
*Note: This is just a basic pattern to follow. I searched (and searched and searched) for exactly what I was looking for and took bits and pieces from a few that I've found. I'm not going to put one of those "copyright" things on this because 1. I'm not the one who designed the knitting needle case (in general, this one I designed) and 2. well, I just wanted to do this tutorial to help others. I've tried to make the instructions as clear as possible so that even the most beginner of beginner stitchers could make this. If you have any questions, or if something is unclear, please contact me multicrafty(at)gmail(dot)com. Now, onto the case!
*~Materials~*

(The following are going to be "group" fabrics to make easier explanation in the directions)
*~Group A~*
1 piece out of your outer fabric measuring 17" by 1.5"
1 piece out of your inner fabric measuring 17" by 5.5"
*~Group B~*
1 piece out of your outer fabric measuring 17" by 1.5"
1 piece out of your inner fabric measuring 17" by 9"
*~Group C~*
1 piece out of your outer fabric measuring 17" by 1.5"
1 piece out of your inner fabric measuring 17" by 12"
*~Ribbon (I had a 42" piece of ribbon and it was enough for the project, in fact it was a little more than what I needed)
*~Embellishments (you could do applique, buttons, flowers, whatever you want on the front)
*~Tailors chalk, fabric pen, or something else that you use to mark fabric
*Directions*
(I used a 1/2" seam allowance for the whole project. Top stitching after it was all done was about 1/8")
Taking your Group A fabric, pin the 17"x1.5" to the 17"x5.5" piece with right sides together and stitch. Repeat for Group B and Group C. (*Note: If you don't want to do this you could use bias tape)


Take it back to your sewing machine and "stitch in the ditch". Trying to get as close to the outer fabric as possible. I use my needle as a guide and lower it down just so it's almost touching the fabric and adjust the fabric from there to get it right where I need it. (You will also repeat this step for Group B fabric as well as Group C.


Take Group C fabric and Group B fabric and pin the to the inner fabric that measures 17"x20" making sure to line everything up at the bottom. I used LOTS of pins for this part because I didn't want this guy to move. I even added more pins after this picture was taken.

Starting and the bottom, measure 2" in from the right and make a mark using your tailors chalk (or whatever else you use to mark fabric) and then from that mark measure 1.5". All pockets are 1.5" apart, the final pocket on the left will be just shy of 2" (or just over 2" I can't remember but it all works out in the end). Make marks at the 1.5" as you go along.


Once you have all your marks made, take to your sewing machine and from one of the middle marks, stitch all the way up, back tacking at each pocket for extra stability and stopping at the top pocket. You want to start in the middle and work your way out that way nothing comes undone or shifts on you.


Repeat for all the marks making sure to back tack at each pocket.
Preparing Group A fabric and if you'd like to have a place for your stitch markers, take a piece of ribbon measure about 6"-7". I didn't cut mine until the very end because I was afraid that I would stitch the ends to it by accident.
Stitch where you have your pins and back tack or go over it a few times for extra security. After that take the fabric and pin it to the inner fabric with the other pockets.

From here, I didn't measure my pockets exactly, I just made these pockets the width of 2 pockets from the previous pockets (does that make sense?). Once again you want to start in the middle to make sure everything stays secure and doesn't shift on you and this time instead of starting at the bottom, you want to actually start at the top of Group A and line it up with your previous stitch marks. Just as shown in the picture below.


After that, just load it up with your knitting stuff and your good to go.


If you have any questions, or if any of the steps were unclear, please let me know. Thanks so much! Also, if you make this project, I'd love to see how yours turned out, just email me at multicrafty(at)gmail(dot)com or post in the comment section.
Edited to add: All pictures are clickable so if you need a better view of how I did something, just click on the picture.
Sunday, August 12, 2007
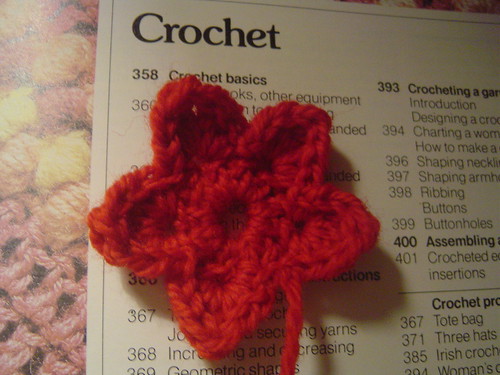
Simple Crocheted Flower
As I said before, I've been fumbling around with my yarn lately and came up with this adorable little flower. It would look super cute in a little girls hair or whatever you'd like to use it as. It's really easy.
*~Note:~*
Please feel free to use this pattern for embellishments for items that you sell. Or make a ton of them and sell them. I just ask that if you would like to use my photo on your website that you please be kind enough to ask permission to use my photo and also, please link back to this pattern as a "Thank You!". Thanks!
Any small amount of yarn and hook to accomodate yarn.
Tapestry needle for weaving in ends.
Ch5, sl st to first ch, ch2
Round 1: 9 dc into the ring, sl st to the ch2
Round 2: Ch1, *sc, hdc, dc, tr, dc, hdc, sc, in same stitch, sl st to next stitch* repeat from * to * around 4 more times. sl st to last stitch, BO and weave in ends.
THAT'S IT! It really easy and really simple and just so cute. If you have any questions about this or need help, you can either email me multicrafty(at)gmail(dot)com or visit CrochetPatternCentral for crochet help.
Wednesday, June 6, 2007
feminine cufflet ~ tutorial
So I made another one of these for K. and L. and decided to kinda give a better tutorial than the one over on my flickr account. So here ya go:
They are super easy and require only minor sewing/embroidery skills
Materials:
~Sewing machine (optional - you can hand sew it together)
~One old pair of toddler overalls (these usually go up to about 12-18mons)with the snaps in the legs
~Embroidery floss - contrasting or matching color
~Embroidery needle
~Scissors
~buttons
~and any other sewing supplies you use (i.e. thimble, or the little doo hickey that helps you thread you needle, i LOVE that little guy)
Directions:
Taking your overalls
cut off the bottom part of the leg. Cutting closer to the next snap up so you have room to fold over and hem it. Or if you want a raw edge cut it so that it'll be about 1" - 1 1/2" wide.
Next, measure on your wrist wear you like for the cufflet to sit.
(in this pic it is snapped together and folded in half. The pin is wear it measures on L.'s wrist. Cut about 1/4-1/2" to the right of the pin.)
Next, placing one piece overlapping the other piece (this depends on how much seam allowance you left in the previous step), take it to your sewing machine and stitch it together or hand sew it together using either a back stitch or a whip stitch. I just used a straight stitch with white thread but you can do a zig zag stitch in a contrasting color or a decorative stitch.
Then, hemming it by hand fold over the raw edge about 1/2" and stitch it into place.
Now you can embroider around the edge. I used a blanket stitch and then went back and placed french knots in between the blanket stitches. I used these directions over on Needle 'n Thread for her embroidery lessons. You can use any decorative embroidery stitch that you want.
Embellish it however you want by sewing on a button (or two) and your all done!
Here is the finished one on K.'s wrist. She absolutely LOVES it.
Friday, May 18, 2007
Kiss My Bum Bag
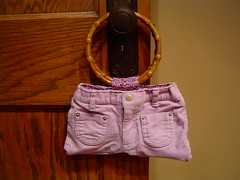
These were L.'s pants that she had outgrown some time ago, while I was cleaning out some stuff today I decided to make a purse out of these. The bamboo handles I had around and were actually suppose to go to another project but in the process of trying to sew the handles out of the pant legs of these pants I ended up breaking a needle, and the lining was some fabric that I had lying around that I had gotten from Wal-Mart with their infamous $1.00/yd. fabric.
Which brings me to my next I ended up not having to go to Wal-Mart today to pick up some needles because after I got done posting my other post I remembered that my sewing maching had came with 3 other needles. So I (and the girls) were pretty thrilled we didn't have to go. It is pretty cold here, which is REALLY strange for this time of year. I think the high today was 50 some degrees but the wind was blowing like crazy which made it even colder.
Edited to add:
This isn't a step by step tutorial but I'll give you the "cliff notes" of it. It is actually really easy and you can do it with ANY pants. Of course toddler and children size pants make for a smaller purse versus an adult size pants.
~First turn you pants inside out and lay them flat so that the waist of the pants match up. Then decide how deep you want your bag to be and cut off right above the crotch area. Stitch it together and trim off any excess fabric. Turn bag right side out.
~Second (and this is how I do it) pick your lining fabric and (with right sides together of the lining fabric) lay the bag on top of it so that the bottom part of the bag is on the fold of the fabric. Trace around the bag leaving about a 1/4" to 1/2" seam allowance and leave about 1" to 2" on top so you can fold it down. Stitch together the lining fabric and place inside the purse folding down the top of the fabric to be flush with the top of the bag.
~Third, you can make handles one of two ways. Either make handles of cloth or (as I did in mine) you can add store bought handles. To make the flap for mine I cut out 4 pieces of fabric that measured about 5" wide (I almost always use a 1/2" seam allowance) and about 7" long. I stitched together the pieces (2 for each handle) with right sides facing and turned them right side out, pressed them, and then top stitched them. I then placed them about where I wanted them to go in the bag and just started pinning everything (tabs,with the bamboo handles in place, and lining). Mine was to thick to fit through my sewing maching so I just hand stitched it together using a back stitch. But hey if you can stitch it together with your sewing machine, well then, I'm very jealous of you! :-)
After that just call it a day and your ready to sport you new bag.
If you need more in depth detail of how to do the bag you can visit Creative Juice via DIY Network. They use corduroy pants but you can really do it with ANY pants.
Tuesday, April 17, 2007
Crayon Cookies
~This project is ONLY to be done under the supervision of an adult. Also, these are not edible.~
Crayon Cookies
~Materials~
-1 muffin pan
-old (or new) broken pieces of crayons (no longer than 1 1/2" long )
-vegetable oil
-paper towels
~Directions~
-Preheat oven to 200 - 250 degrees. Wipe the inside of the muffin pan with a little vegetable oil on the paper towel.
-Have children help take the paper off any crayons that still has it and break up the pieces.
-Next have children place the crayons into the muffin pan about 1/4 the way up.
-Adult places the pan in the oven and set timer for about 5 min. but check on them after 2 min. If, after 5 minutes there are still bits that didn't get melted let them cook for about another 3-5 minutes but check on them frequently.
-After they are done take them out and set them on the stove top or on a hotpad.
-Let them cool COMPLETELY before removing them.
Other options you can do is you can use muffin cups. You can add glitter to the crayons before you put them in the oven. You can also make them all one color if you like or you can make white, red, and green ones for Christmas or pink and red ones for Valentine's Day, or orange and black ones for Halloween, or make them the colors of their school. They color just like regular crayons and if you mix the colors such as my girls and I did, when they color they get all sorts of colors. It is also a GREAT way to teach preschoolers about what colors mix with another color to get another color (such as red and blue make purple, blue and yellow make green, you get the idea)
Have Fun!
Monday, February 19, 2007
Yummy Scrummy Scarf ~Free Pattern~